Super Soil Recipe: A Fun, Practical Living-Soil Guide
Picture this: you just bought a big bag of bat guano, a sack of worm castings and a mystery bag labelled "blood meal". You dump it all into a pot, plant your seedling, and feel like a proud organic chef. A week later the leaf tips look crispy and you're wondering what went wrong.
The answer is usually simple: super soil is powerful stuff, and it needs a little patience. This guide keeps our house recipe at the center, explains what each ingredient actually does, and adds research from universities and peer-reviewed journals so you know why each step matters.
What Is Super Soil, Really?
Super soil (also called a "hot mix") is an organic soil blended with nutrient-rich "hot" amendments such as bat guano, blood meal and bone meal. It is not a bag of potting soil you can plant into straight away. It needs to be mixed, moistened and left to rest ("cooked") first.
Think of it as a slow-cooked stew for soil life. Microbes break down the organic ingredients over time and release nutrients gradually, instead of all at once.
Why "Hot" Amendments Need Respect
Some organic fertilizers release nutrients surprisingly fast. A study in HortTechnology found that high-nitrogen organic fertilizers such as blood meal, feather meal and seabird guano released roughly half of their organic nitrogen within two weeks in soil.
That is great for a hungry, established plant, and a bit much for young roots. This is exactly why super soil goes at the bottom of the pot, not around the seedling.
Quick tip: "Organic" doesn't mean "gentle". Hot amendments can still overwhelm young roots if they're too close.
The Living Part: Microbes and Mycorrhizae
Living soil is all about the tiny workforce: bacteria, fungi and other soil life that turn organic matter into plant-available nutrients.
Arbuscular mycorrhizal fungi are a star player. A review in Frontiers in Plant Science describes how these fungi partner with roots, extending their reach and helping with uptake of nutrients (especially phosphorus) and water. Think of them as the plant's delivery riders.
The Golden Rule: 1/3 Super + 2/3 Base
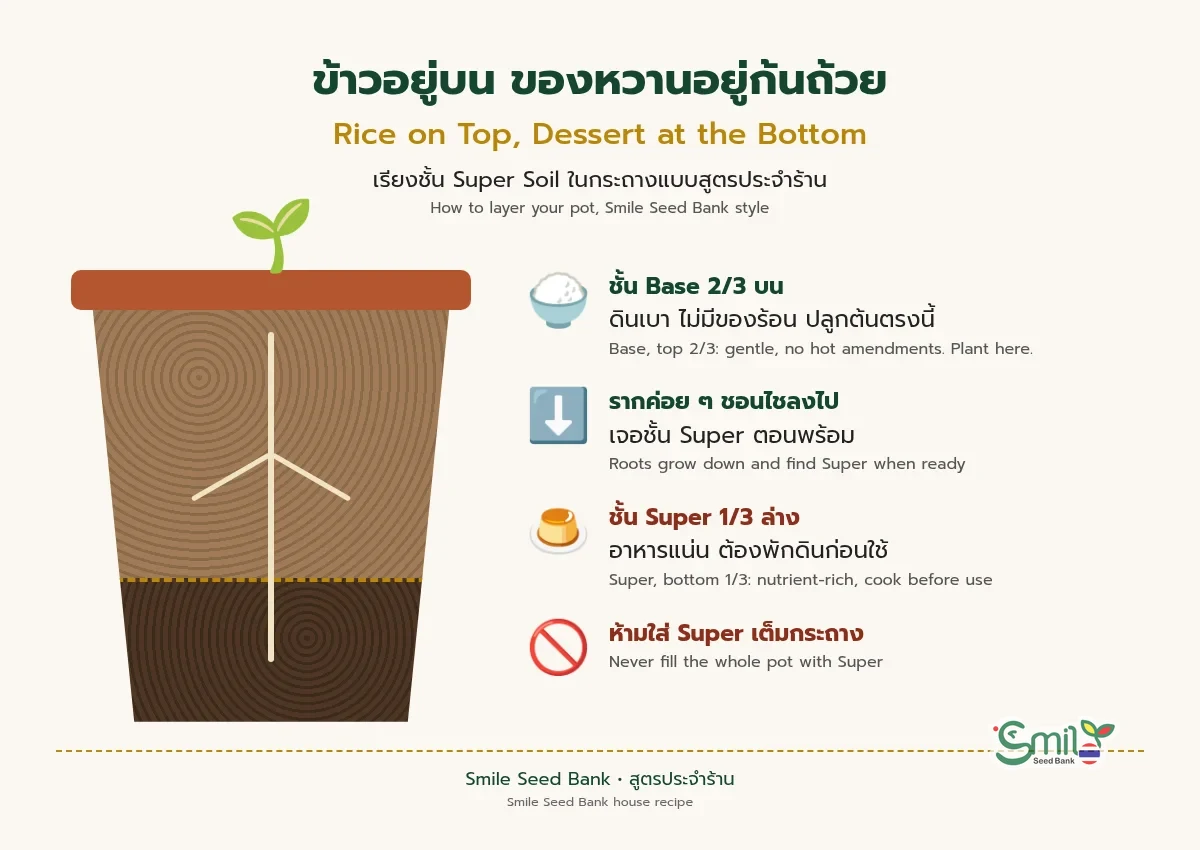
Our house method uses two separate mixes:
Super layer: the nutrient-dense "hot" mix, placed in the bottom 1/3 of the pot.
Base layer: a lighter mix without hot amendments, filling the top 2/3 of the pot.
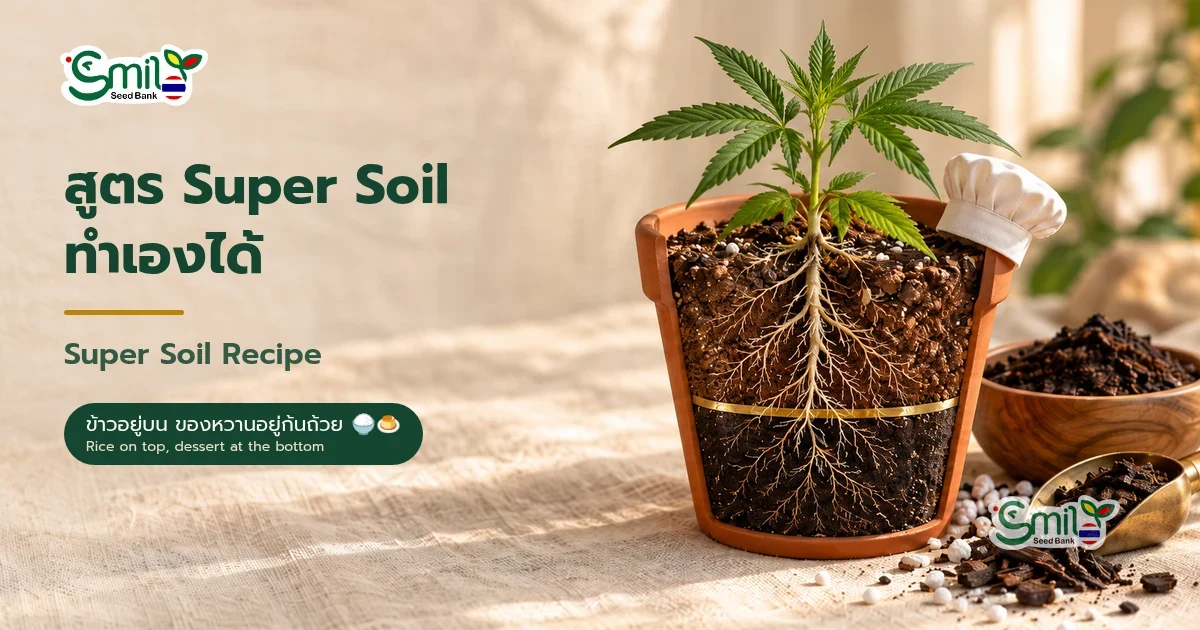
You plant only into the Base. As the plant grows, its roots work their way down and find the Super layer when they're ready for it. It's like putting dessert at the bottom of the bowl: you have to earn it.
Quick tip: Never fill the whole pot with Super. Young roots sitting in hot amendments are at risk of nutrient burn.
Basic vs Advance: Pick Your Level
Basic Super: a leaner mix with lighter amounts of guano, kelp and lime. A friendly starting point for beginners.
Advance Super: adds bone meal and blood meal for a fuller, longer-lasting mix aimed at full-cycle beds and more experienced growers.
If this is your first batch, start with Basic. You can always level up next time.
Ingredient Cheat Sheet (Smile Seed Bank House Recipe)
The percentages below are our shop's own house recipe, built from practice and common super-soil methods, not lab-tested values. Treat them as a starting point and adjust to the materials you have. Where research gives a guideline, we say so.
Ingredient | What it does | Base layer | Super layer | Watch out for |
|---|---|---|---|---|
Coco coir | Structure, holds moisture, keeps air around roots | Main media (~30–45% by mode) | Main media (~30–45% by mode) | Rinse low-quality coir to reduce salts |
Peat | Holds water, adds structure, slightly acidic | Alternative to or blend with coco | Alternative to or blend with coco | Can get soggy; pair with perlite |
Finished compost | Organic matter and food for soil life | Up to ~25% | ~22–25% | Use only fully finished compost |
Worm castings | Gentle source of nutrients and soil life | ~15% | ~18–20% | Slightly salty; don't overdo it near roots |
Perlite | Drainage and air | ~10–15% | ~10–15% | Skip it and the mix compacts |
Biochar | Holds water, home for microbes; not a fertilizer | None | ~5–6% | Small dose, Super layer only |
Bat guano (high-P type) | Phosphorus plus trace nutrients | None | Basic ~2% / Advance ~4% | Hot; never in the Base layer |
Kelp meal | Potassium and trace minerals | None | ~1–2% | A supplement, not the main feed |
Bone meal | Slow-release phosphorus and calcium | None | Advance only, ~3% | Must be cooked before planting |
Blood meal | Fast-release nitrogen | None | Advance only, ~2% | Very hot; keep away from young roots |
Dolomite lime | pH buffer, calcium and magnesium | None | ~1–1.5% | Too much pushes pH too high |
Gypsum | Calcium and sulfur with little pH change | None | ~1–1.5% | Supports lime, doesn't replace it |
Quick tip: For worm castings in potting mixes, UGA Extension suggests about one-fifth to one-quarter of the mix by volume. Our Super layer sits close to that range, and the Base stays lighter on purpose.
How to Make Base Soil
If Super is the rich dessert at the bottom of the bowl, Base is the comfy main course on top. It's the gentle 2/3 layer where your seedling first puts down roots, so it needs to be light, airy, moisture-holding and free of hot amendments.
Base has one job: give young roots a calm, well-drained home while they grow strong enough to reach the Super layer below.
Base Soil Ingredients (Smile Seed Bank House Recipe)
The proportions below are our shop's house recipe, based on practice and common potting-mix methods, not lab-tested values. Adjust them to the materials you have.
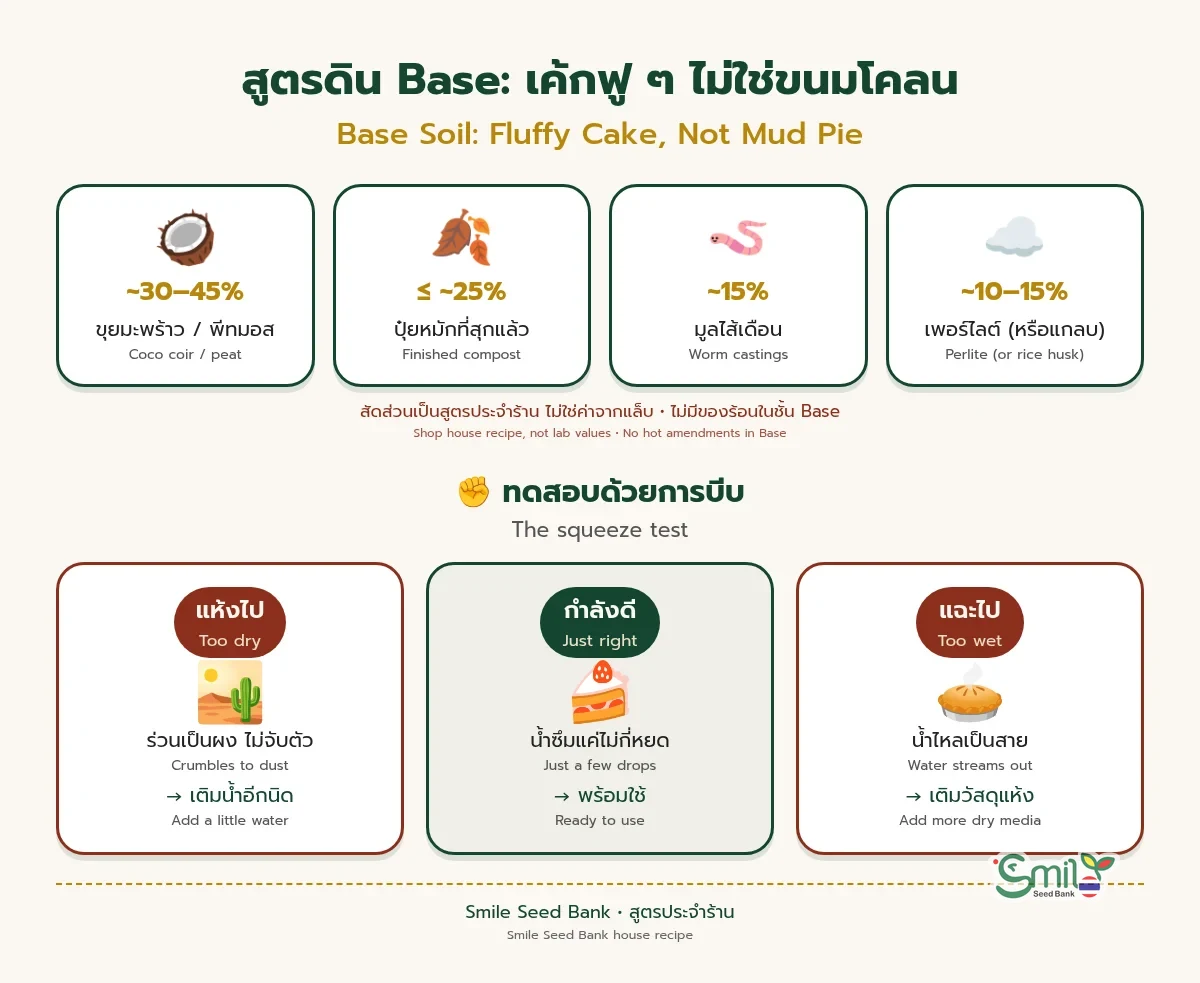
Coco coir and/or peat (main media, ~30–45% depending on mode): the body of the mix. Holds moisture while leaving room for air.
Finished compost (up to ~25%): organic matter and food for soil life. Use only fully finished compost, since extension guides warn that uncured compost can harm plants in potting soil.
Worm castings (~15%): a light dose of gentle nutrients and soil life. UGA Extension suggests roughly one-fifth to one-quarter castings for potting mixes, so our Base stays at the lighter end on purpose.
Perlite (~10–15%): drainage and air. Many growers use rice husk for a similar airy job as a common, easy-to-find alternative.
No guano, no blood meal, no bone meal. Those belong in Super only.
Step-by-Step: Mixing Base Soil
Gear up. Put on gloves and a dust mask, and lightly mist dry perlite or coir to keep dust down.
Prep the coco. If you're using compressed or low-grade coir, soak and rinse it first to wash out excess salts.
Add the main media. Pour coco and/or peat into a clean bin or onto a tarp.
Add compost and castings. Spread them over the top, breaking up any clumps.
Add perlite (or rice husk). Sprinkle it in evenly.
Mix well. Turn the pile from the bottom up until the color and texture look even all the way through.
Moisten gradually. Add water a little at a time and mix again.
Do the squeeze test. Grab a handful and squeeze. A few drops is perfect. If water streams out, it's too wet: add more dry media. If it crumbles to dust and won't hold together, it's too dry: add a little more water.
Store or use. Base doesn't need a long cook like Super. Keep it covered and shaded until you layer your pots.
Quick tip: Think "fluffy cake", not "mud pie". If your Base feels heavy or sticky, add more perlite or rice husk before you blame the plant.
Base vs Super at a Glance
Base layer | Super layer | |
|---|---|---|
Position in pot | Top 2/3 | Bottom 1/3 |
Role | Gentle starting home for young roots | Nutrient-rich reserve roots reach later |
Hot amendments (guano, blood/bone meal) | None | Yes |
Worm castings (house recipe) | Lighter, ~15% | More, ~18–20% |
Needs cooking before use | No long cook needed | Yes, cook first |
Where you plant | Plant here | Never plant directly into it |
Step-by-Step: Mix and Cook Your Super Soil
Step 1: Gear up.
Wear gloves and a dust mask. Dry perlite, meals and powders get dusty, and you don't want to breathe them in.
Step 2: Mix the Base in bin A.
Follow the How to Make Base Soil section above: coco or peat, finished compost, a light dose of worm castings and perlite, mixed evenly and moistened until it passes the squeeze test.
Step 3: Mix the Super in bin B.
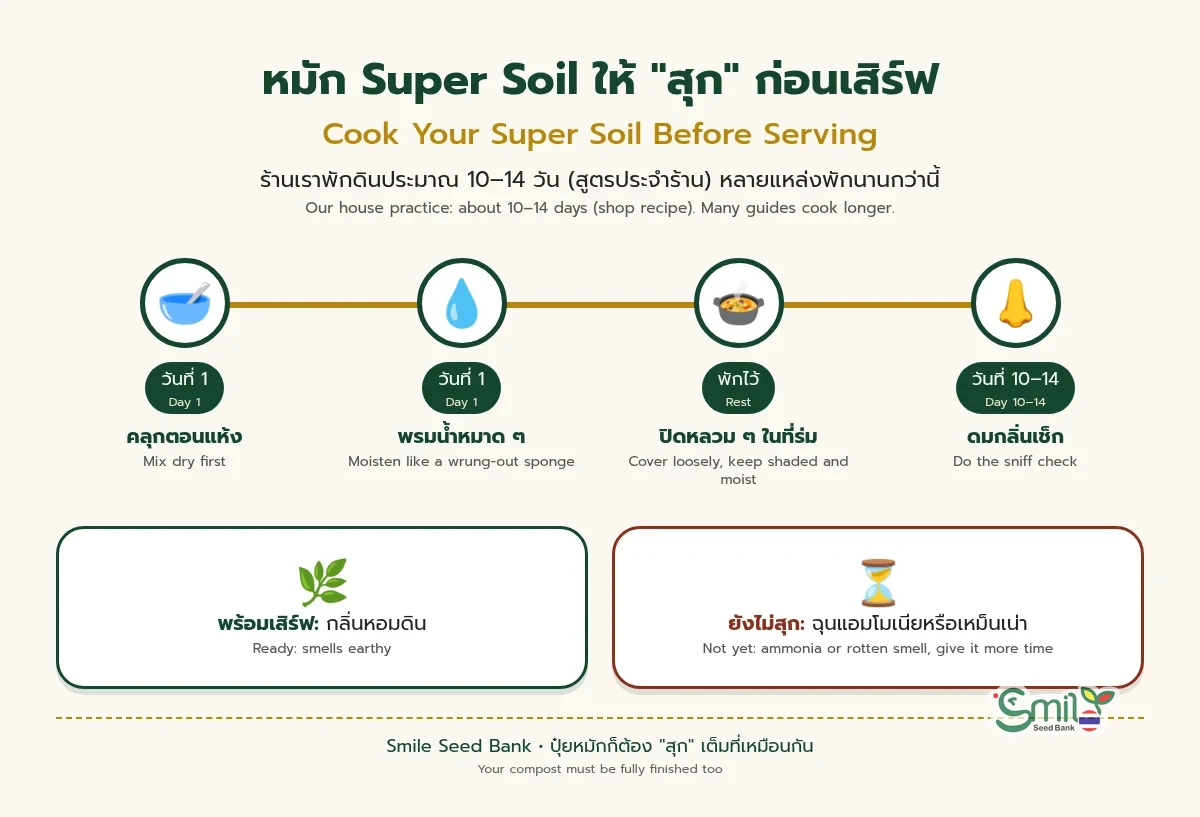
Start with the same bulky ingredients, then add biochar, guano, kelp, lime and gypsum (plus bone and blood meal for Advance). Mix dry ingredients thoroughly first so the hot amendments don't end up in clumps.
Step 4: Moisten, don't drown.
Add water gradually until the mix feels like a wrung-out sponge: damp, holding together lightly, with no water dripping out.
Step 5: Let it cook.
Cover the Super bin loosely, keep it in the shade, and keep it lightly moist. Our house practice is to cook for 10–14 days; many community guides cook longer, so extra time won't hurt. Check it now and then: it should smell earthy, not like ammonia or rot.
Step 6: Layer the pot.
Fill the bottom 1/3 of the pot with cooked Super, then top with 2/3 Base. Plant only into the Base layer.
Step 7: Water gently and observe.
Water with plain water and watch your plants. Later in the cycle you can top-dress with a thin ring of worm castings around the plant, keeping them from touching the stem, as extension guides recommend.
Quick tip: Not sure how much of each ingredient you need? Use our /tools/soil-mixer to calculate volumes from the materials you already have.
Why Finished Compost Matters
Compost is the backbone of both layers, but only if it's finished. WSU Extension notes that uncured compost may harm plants, especially when used in potting soil, while UF/IFAS Extension says compost for containers must be thoroughly composted.
How to tell it's ready: it has shrunk a lot, you can't recognize the original materials, it no longer heats up, and it's dark, crumbly and smells earthy.
Quick tip: If your compost still smells sour or feels warm, give it more time. Your plants will thank you.
Common Mistakes (Learned the Hard Way, So You Don't Have To)
Myth 1: "Super soil is ready the moment you mix it."
Nope. Hot amendments need time to settle. Planting straight into a fresh hot mix is one of the most common causes of burnt leaf tips.
Myth 2: "More amendments = more growth."
Not really. Research on cannabis in coir-based organic substrates found an optimal organic fertilizer rate, not a "more is always better" curve. Balance beats excess.
Myth 3: "Organic means you can't overdo it."
Organic fertilizers like blood meal can release nitrogen fast. Too much, too close to young roots, can still cause burn.
Myth 4: "Any compost will do."
Unfinished compost can hurt plants in containers. Use compost that is fully finished and cured.
Frequently Asked Questions (FAQ)
1. Can I plant directly into super soil?
We don't recommend it. Plant into the Base layer and let roots reach the Super layer at the bottom over time.
2. How long should I cook super soil?
Our house practice is 10–14 days, kept lightly moist and shaded. Many growers cook longer. The best sign it's ready is an earthy smell with no ammonia.
3. Can I reuse super soil?
Many growers recharge used soil by mixing in fresh compost, castings and amendments, then cooking it again. Watch for compaction and old root mass.
4. Do I need mycorrhizae?
They're optional, but research shows mycorrhizal fungi can help roots take up nutrients and water. A living mix with good compost and castings gives them a friendly home.
5. Can I use Base soil on its own?
Yes, for young plants it works as a gentle starting mix, since it has no hot amendments. It's lighter on nutrients than Super, though, which is why our method puts the Super layer underneath for later in the cycle.
Summary: Patience Is the Secret Ingredient
Super soil works best when you respect its power: keep hot amendments in the bottom 1/3, plant into the gentler Base, use only finished compost, and give the mix time to cook. Research backs the big ideas: organic fertilizers can release nutrients fast, worm castings work best as part of a mix, and soil life does a lot of the heavy lifting.
Mix it right, wait a little, and let the microbes do the cooking.
Sources
Disclaimer: All seeds from Smile Seed Bank are sold as souvenirs for collection and educational purposes only. Buyers must be 20 years of age or older. It is the buyer's responsibility to check and comply with the laws of their own country or region. Smile Seed Bank is not responsible for any misuse.